
Why Is Pipe Smoking Popular Today?
"Today, with over 10 million pipe smokers in America alone, the symbol of the pipe still provides an image of stability and in fact, is stronger than ever before due to a constant closing in and fear of the technological world around us. The pipe remains standing as a bastion of individuality and security. With the advent of computers, laser beams, and dehumanizing robots and words like "artificial intelligence," "petrodollars," and "megapollution," mankind’s natural instinct is to seek solace and retain a sense of self-esteem by returning to the very basics of life. The pipe provides much of this. It is a trusted friend, a "working" companion and a symbol of all that is right and orderly in the world."
-Richard Carleton Hacker
The Ultimate Pipe Book
Page 34 | ©1997
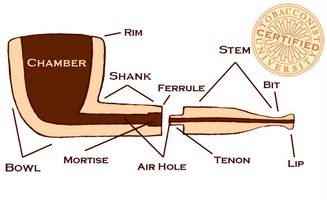
What Are The Parts of a Pipe Called?
Whether bent or straight, briar or meerschaum, the components of a good pipe, as illustrated above, are basically the same.
How To Fill A Pipe Before Smoking
The simplest way to fill your pipe (not to pack it, but fill it) is to sprinkle your pipe tobacco into the bowl until the pipe bowl is filled at the top. Gently apply enough pressure with your finger (or tamping tool) to press the tobacco down into the bowl until it is about halfway full. Sprinkle more tobacco into the bowl until it is full at the top. Once more, press down into the bowl until it is around 3/4 full. Once final time, sprinkle tobacco in to achieve a filled bowl and at this moment, give it a firm press so your tobacco is just slightly below the top of the bowl. At this moment, give your pipe a test draw. If the air comes through it as when sipping a soda through a straw, you did a great job. If it draws too loosely (no resistance whatsoever), your filling technique is too loose. If the draw is similar to that of a milkshake through a straw, your pipe is packed too tightly. You can always remove the tobacco and make a new attempt before lighting up. Once the fill is just right, you are ready to light your pipe and relax.
How Should I Smoke A Pipe?
Smoking your pipe tobacco is quite different than drawing smoke from a cigar. It is a simple and relaxing technique that requires far less effort to draw your smoke. You do not want to inhale your smoke into your lungs, although some cigarette smokers do intentionally/accidentally on occasion. Do not inhale smoke into your mouth in a hard or fast manner. Simply draw from your pipe softly and steadily until the smoke fills your mouth -- and then, exhale slowly. Much like with cigar smoking, you can also practice the art of the retrohale to appreciate any nuances. When doing a retrohale, gently press your tongue against the roof of your mouth (just behind your front teeth) while keeping your mouth closed during the exhale period. Many will notice that using a retrohaling technique will bring forth subtle fragrances and flavors from the pipe tobacco that the ordinary exhale will not. The goal for pipe smoking enjoyment is to not burn up the tobacco quickly - but to enjoy the flavorful experience for as long as your time will allow.
Lighting Up: You can light your pipe with a soft flame lighter (think Zippo) or wood matches. Do NOT use a butane torch lighter because the high heat could easily damage your bowl. To light the pipe tobacco you will hold the flame ABOVE the tobacco and draw from the pipe in a steady manner. As you draw, you should be able to 'pull the flame' toward the tobacco. Give it a good and well rounded pass as your flame goes around the bowl during your puff. This gentle technique will provide your first of two lighting stages called the 'charring light'. Now use a tamping tool (or your fingertip) to gently press the tobacco back into the bowl as this initial lighting will cause most tobaccos to expand. Now for the 'true light' stage. Draw your flame toward the pipe as before but at this time, be sure to get the flame to go around the entire bowl to light the pipe tobacco with a steady and gentle technique. This 'true light' should keep your bowl lit as long as your take a gentle puff (or even draw) from it about twice per minute. It is common for new pipe smokers to draw too hard or too fast. It is also quite common to have to relight the pipe tobacco every so often. Do not be alarmed if your tobacco needs a gentle flame periodically. Different tobaccos burn quite differently and some have more moisture than others. The goal is to enjoy your time with your pipe. There are no pipe smoking critics or snobs.
Moisture In My Pipe! Why?
Many new pipe smoking enthusiasts complain of a gurgling sound and moisture issues while smoking their first few bowls. The cause behind this issue is normally due to one of two factors.
1.Your pipe tobacco is too moist.
It must be allowed to dry for a few minutes prior to filling the pipe bowl. To do this, simply take a small amount of tobacco from your tin or pouch and give a gentle squeeze to it prior to filling the pipe. If the tobacco tends to 'stick together', it is too moist and will cause these issues while smoking it. Allow this small amount of tobacco to dry out on a plate or piece of paper for several minutes and pinch it again. Once the moisture issues (sticking) have went away, fill your pipe bowl and enjoy! Just don't smoke it too fast or you'll find yourself guilty of part 2 in this section.
2.Your smoking technique may be too fast for this particular tobacco blend.
In other words, don't draw the pipe as hard or as quickly between puffs. Aromatic blends (flavored tobaccos) are famous for building moisture within the pipes when they are smoked too quickly. You can eliminate the moisture in the pipe during any smoking session by gently inserting a pipe cleaner about 3/4 down through the stem between puffs as needed.
Just don't push the pipe cleaner so far as to disrupt the tobacco lying in the bowl. If you do, your next draw won't be very enjoyable as you'll get a mouthful of tobacco bits stuck in your teeth because your pipe cleaner went too far and disrupted the tobacco embers at the bottom of the bowl.

Bent or Straight?
There are two general style classifications for pipes: straight and bent. A straight pipe has a straight shank and stem and will be more inclined to directly transmit heat and moisture to the palate. A bent pipe has a curved shank and stem and tends to collect more moisture at the bottom of the bowl, below the bend of the shank. Both styles have a distinct feel and balance in the hand and mouth, which pipe smokers appreciate for different occasions or moods.
What Bowl Type Is Best?
The bowl of any pipe must be capable of resisting very hot temperatures and flame over long periods of time. For this reason, the bowl must be carved to perfection. The chamber wall must be consistent in thickness and density to prevent embers from burning through the wall. Great pipe making begins and ends with the bowl; without a finely crafted bowl the pipe will never work properly.
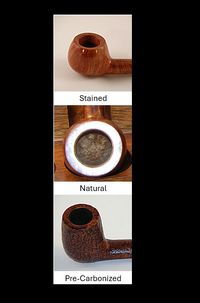
The chamber of a briar bowl can be finished in a variety of ways, including pre-carbonized, natural, and stained. A natural bowl will have no stain or finish applied; it will be sanded smooth or rough, depending on the makers preference. A stained bowl will have a color stain applied to give the inside of the bowl an attractive tint like the outside of the bowl. This process is considered a waste of time by many since the bowl will char and carbonize soon after the pipe is smoked. In addition, it is possible the stain may impart some flavor to your tobacco before the bowl chars and forms its own protective finish: carbonization. Pre-carbonization is a modern finish which mimics the carbonization process, and leaves a thin coating on the interior wall of the chamber. Pre-carbonization is useful if the chamber has aesthetic or structural imperfections which the maker would like to hide. Otherwise, no chamber finish is necessary for a high grade briar.